Friday, December 18, 2015

SuperPro rear sway bar installed!!!!!! Kill that understeer

I received a SuperPro rear sway bar from a group buy for $225 shipped. It came all the way from Down Under.

RSB is installed. I haven't tested it out yet but i'm sure it'll be a nice difference.

below are some comparative pics vs stock.

You'll need triple square bits which I got from Amazon.  I didn't drop the exhaust as another member did. It just took me a few minutes to get the rsb out and the new one back in.

video had a short summary of what to do.


Saturday, December 5, 2015

BK Motorsports TuningBox installation and comparo to Burger Tuning JB1

After a couple weeks of myself and my family getting sick and also just getting plain lazy from the Thanksgiving holiday I'm back baby!!!!

I just removed the Burger Tuning JB1 so I could start testing out BK Motorsports TuningBox. Others have stated and I agree that it's manufactured by someone else and getting labeled under BK. I can't tell you yet if the tuning map itself is the same or not. I'll check with BK on that.

Here's some videos of the wiring comparison, where the TuningBox connects to and how you make your adjustments.

Stay "tuned" for my butt dyno opinions versus JB1.

Dyno tests have been completed!!! Tuning Box put of 30whp. JB1 substantially more.


Saturday, November 21, 2015

I'm a tune tester!!!!

I'm going to be testing a piggy back tuner called TuningBox on my R soon. It'll be dynoed on the same dyno as the JB1 I have. I'm curious on my butt dyno results and overall driveability. Stay "tuned" pun intended.

So far it appears that the TuningBox is a multi-platform type of item meaning it can fit several cars depending on the configuration. 

There are 3 specific plugs for the piggyback which reminds me of the Neuspeed product.

check out the unboxing video for details:


more general info here: http://bk-tuningbox.com/

They'll be more videos, dyno charts, etc.

Again..stay tuned.

Tuesday, October 27, 2015

How did fingerprints get in my headlight housing?!!? AND IT'S POINTING WEIRD!!! UPDATED WITH VIDEO

So as you know I'm the original owner of my Golf R.

I wanted to change the cornering lights from the yellow shade to white to match the HIDs from the headlights. Well I bought a cheap pair (under $2 on ebay) and one was bad. I looked how it lit up and then I discovered the fingerprints! I wore rubber gloves but in order to put your paws in that reflector there are only 2 ways:

When assembling the housing or if for some reason you decide to stick a finger in the bulb opening for whatever nonsensical reason.

I wore gloves by the way so even if I had some weird thought to "finger" my headlight it wouldn't do that.


Well crap! I thought it as my imagination that it was also pointing too high until I tested it tonight in a dark business park! Horrible QA on the lights. If it wasn't the manufacturer who did this then why would the dealership do it? Makes no sense but at the same time explains how the fingerprints got there like they tried to do something with that corner light. I know that the headlight points a little higher on the left as well. 

Check out my video showing the light difference!


Sunday, October 25, 2015

Pics of DYNO day and rolling shots GTI


Dyno Day for GTI's and little ole me....


This morning we did a meet up /dyno day where 6 out of 7 MK7s were GTIs and myself the lonely R. As you may know I'm using the Burger Tuning JB1 "stage 1" piggy back and an APR intake. No other power mods.
The rest of the crew were all stage 2 versions of Revo, Eurodyne, Apr and Giac.

I did a respectable 309hp and 339 lbs tq at the front wheels. It was run like this because unless you have a roller type of dyno and the right settings, it won't run right. I think I like 2 wheel drive mode only since it's a head to head with the little brother GTI. 

All in all for $400 and getting 45hp, it's not a bad mod. I'm planning on tweaking it with Map 6 to get better boosting.


Saturday, October 17, 2015

Gotz me some new shoes

I picked up some 18x8 OZ Ultraleggera in 18x8 +45 wheels the other day. It was used set and the I got them for a really good price. Buying wheel can be risky. You really have to check for bends and cracks. If they have them they will be a safety issue or cannot ever be balanced right having shakes and shimmies while driving.

There was some curbage but I sanded them down and used an old can of gunmetal spraypaint. it wasn't perfect but you wouldn't be able to tell unless you really look at it.

curbed
more curbage
tire was replaced so i didn't care to mask it

much better!


Without further ado...


Thursday, October 15, 2015

Pedal Box your way to full throttle!

Picked up a PedalBox throttle booster and installed it.

It wasn't too hard disconnecting the harness and connecting the unit but I cheated and read someone's post with pics. If you don't install it securely you'll get Christmas lights in your dash and it'll run like crap.

It looks exactly like the Remus Responder down to the shape and lights. I'm going to say one is a relabel.


I think overall the pro is if you don't want an ecu tune and no warranty hassles this is a nice feature.

Don't put it in sport plus in bumper to bumper traffic. You will probably plow into another car or wall like you see on TV.

And don't leave it on for anybody borrowing your car. Seriously here.

My video review below


Saturday, October 3, 2015

Trying to avoid Johnny Law with the Cravenspeed front license plate holder and custom CA black plates

I've had my personalized plates for a few years and on 3 cars.

I found out earlier this year that DMV approved the 1960's style legacy plates so I placed my order.

click here for DMV info

Exactly 3 months later they arrived.

I hate drilled holes in bumpers so I made sure that the dealer didn't touch it.

I got a good deal on a cravenspeed plate holder from a forum member and it was new in box.

Installation was simple and looks to be a quality piece. the only thing is it would look better towards the center a little more but check out my video for my explanation.


Thursday, October 1, 2015

Comfort as it should have came from Germany! - Coding for remote windows open and close and reverse mirror drop

I purchased a Ross-Tech micro-can cable to do VCDS updates or VW coding.

I did the coding for remote windows open and close and reverse mirror drop.

It's not to difficult but you need to be patient and do each step EXACTLY as stated. If not you can do something bad and brick your module which only the dealer can restore.

Check out my videos for a demo of the coding.

micro-can interface and 034 dogbone insert


Wednesday, September 30, 2015

Give a dog a 034 dogbone insert

I picked up this second hand from another R owner because he had what they called the "mystery part".

Anyhow the point of this insert is to firm up things such as shifts. Here's what their site says:

The 034Motorsport Billet Aluminum MQB Dogbone Mount Insert for MkVII Volkswagen Golf/GTI/R & 8V Audi A3/S3 is designed to fill the large void in the factory dogbone mount, and limit drivetrain movement without sacrificing ride quality or introducing excessive additional noise, vibration, or harshness into the cabin. 

By filling the void in the factory mount, this insert eliminates the associated slop to ensure that you experience crisper shifts and a smoother driving experience. Unlike polyurethane insert options on the market, this billet aluminum part will not pack and wear over time, and guarantees long-lasting performance.

So installation was a breeze because I had my trusty Milwaukee impact gun. I've learned over the years that proper tools make the difference.

Anyways so far I'm getting vibration at idle. Other Golf owners stated there was either some to none but as you can see from 034's site it says it won't bring "excessive" nvh.

So after starting the car in the morning and having a cold start then driving warmed up I would say it's a nice mod but you will have vibration at idle and some during the lower rpms. The upside is there is a nice crispness with shifting and things are tighter. If you are modding your car with suspension mods, noisier but stickier tires, louder exhaust, intake, downpipe, etc... I think you'll like it. If you just want simple mods and a stockish car I say you may want to pass. However since it's $50 and you can sell it for $35 shipped any day if you don't like it...give it a try.

Here's my video review


I LOVE my impact gun

Looks nice don't it?

Saturday, September 26, 2015

Suck it up / suck it in with the APR Carbonio cold air/ ram Intake!!!!

I told myself to reduce my modding addiction but dammit, these deals are too good to pass!

I decided to pick up a used APR intake for a really good deal. I'm honestly not a CF guy but since I ended up with a cf lip I'll just suck it up.

It did have a few nicks on it but nothing to complain about and my car isn't for show so I'm fine with it.

Installing the intake took about 15 minutes maybe more because I was just taking my sweet time.

CF goodness


One thing I read about and just noticed too is that you can't rev the R like other cars. It stops below 4000 rpm. I guess that's a good thing for some people...including me.


video is just a quick run showing the sound of the intake. It seems to spool up faster. At least that's what my butt dyno tells me.


Sunday, September 20, 2015

I shaved her clean!!!

Yes I shaved her....the side fender badges that is!

I felt that since they weren't functional in any way I'd just pull them off. It was a 95+ degree day so it wasn't too much effort yanking the side where the sun was toasting on the emblem. I didn't have any Goo Gone with me so I had to make do with what I had which was a microfiber cloth and wd40.

The cooler side took a lot more elbow grease but I cleaned all the adhesive off.  Used some polish to remove the light scratches from the mf towel and looks great! No regrets.

That adhesive required using my kung fu grip

So fresh and clean!!!!!

Saturday, September 19, 2015

My first canyon run in the R

I went to Glendora Mountain Road tonight otherwise known as GMR to a lot of the race guys, cyclists, tourists, etc...

There's some seriously sharp turns on this road. You definitely have to pay attention or you going to get into trouble.

We hung out at the top of the mountain with a few others. It was pitch black up there...well the entire road was but HIDs are helpful. Anyhow I decided to try some light painting using my phone along with my Canon 6D and new 24mm Sigma Art lens.

I recorded a video on my dash cam and uploaded 3 minutes of it. You'll get the gist of the road. Also notice how quick my headlights change angles from right to left. Great for this kind of night driving.

I was running in manual sport and between 3500 and 5000 rpm depending on gears. I used my paddle shifters during the whole run. I disable traction control but not fully. If you choose full ESC it will brake and understeer too much.

The R held it's own. I could catch on to the S2K but since I wasn't familiar with how the turns were I downshifted earlier when entering the curves. I have to say DSG is really nice to have.


Here are my light paint shots of my car and the s2000. I think it came out decent for a pitch black location.


Tuesday, August 25, 2015

Things I don't like about the Golf R

So I've had my R for close to 3 months and 3300 miles.

I like a lot of things about the R but there are some quirky things that I don't like but I've moved on accepting it is what it is.

  • the smallish radio display. Not only it's like an Atari like large pixel screen (like Pixels the movie) it's slow as well. The good thing I don't have navigation so it doesn't bother me too much BUT the 2016s have remedied this with a cleaner screen.
  • what's up the the old school fat ipod plug? I mean it's 2015. It's all about lightning plugs. I know the flat plugs aren't ancient but in technology it is. VW could have tossed in a free lightning cable or even better a female USB connector so we can choose what to plug in! Again 2016s have remedied that what a USB port.
  • inconsistent interior trim choices - I'm referring to the door panel and passenger dash having a carbon fiber panel but the center console and trim, the steering wheel and speedo cluster trim are piano black. I don't mind either. Just choose one!
  • The blue door panel / door sill lighting is a nice night time accent feature. They should have extended it to the rear doors.
  • The infamous locked center armrest - Forum members had to find a fix since it wasn't legal for VW to send a armrest that can open due to have a electronic emergency brake. Now I really don't use it for much but hey...make it solid if it's not an option here!
  • Knee room feels like owning a mini van. Luckily I don't move my legs much but I have to say being 6' 1" and my knees are really close to the front console. The steering column sits lowish too and I feel like I can straddle the column if I needed to. Perhaps I can close up my knees  on a curve?
  • For an almost $40k car why not have memory seats? The leather quality is high end and comfortable. There are plenty of other adjustments like lumbar. 
  • Last but not least. When you put the AC on max the small display says "LO"  That just seems lost in translation unless it means the lowest temp possible. It should have been "HI" or "MX"
Overall I still like the car and the comfortable seats. It's the little things.


Really? Who owns an old ipod/iphone for a new car?

Carbon Fiber and lights are nice

Mini van knee room

LO for Max AC. Really?


Thursday, August 13, 2015

JB1 overview get 35hp plus just with 4 plugs!!!

Just did my video of the JB1 overview.

It's not a how to install but pointing out things. The top 3 plugs will take you less than 5 minutes.

The bottom one is the bugger! I'm not sure who has wafer thin arms to get access to the top. After 10 minutes of trying to figure out where the heck was that plug I decided to go under which I should have in the first place.

The second challenge was removing the plug. I didn't recall the advice to actually push into the plug then loosen it as it forms some sort of vacuum.

Now for performance...woot!!! Talk about POWAH!

I recommend this product because of a few things:


  • plug n play - you can install it and not wait for a shop to install or uninstall
  • it's completely undetectable once removed. BMS has been in the game for several years on Bimmers and there hasn't been any issues on their latest products. Prior they used to solder so that made things more obvious to the watchful technician but not any more
  • It's priced nicely. This stage 1 tune runs about $400. Besides for a direct competitor of Neuspeed the other tunes (albeit ecu flash) run $600 or more. APR is one of the most popular and you'll be paying $800 plus possible labor. 
If you're in California, you Burger will not sell you this direct. Message me if you need help getting it here in Commifornia for "off-road" use of course.


Monday, August 3, 2015

Guard your grill!

Volkswagen for whatever reason didn't think that a rock could go through the center bumper grill and hit the AC condenser lines. I've read reports of this happening to several people in the VW and Audi forums. Since this wasn't considered a factory defect, owners who had this problem had to pay out of pocket for it in the range of $1000 or use their auto insurance policy claim and pay the deductible. If you look at the coolers in the side bumpers they put a nice plastic grill covering those lines but not anywhere in the large center area.

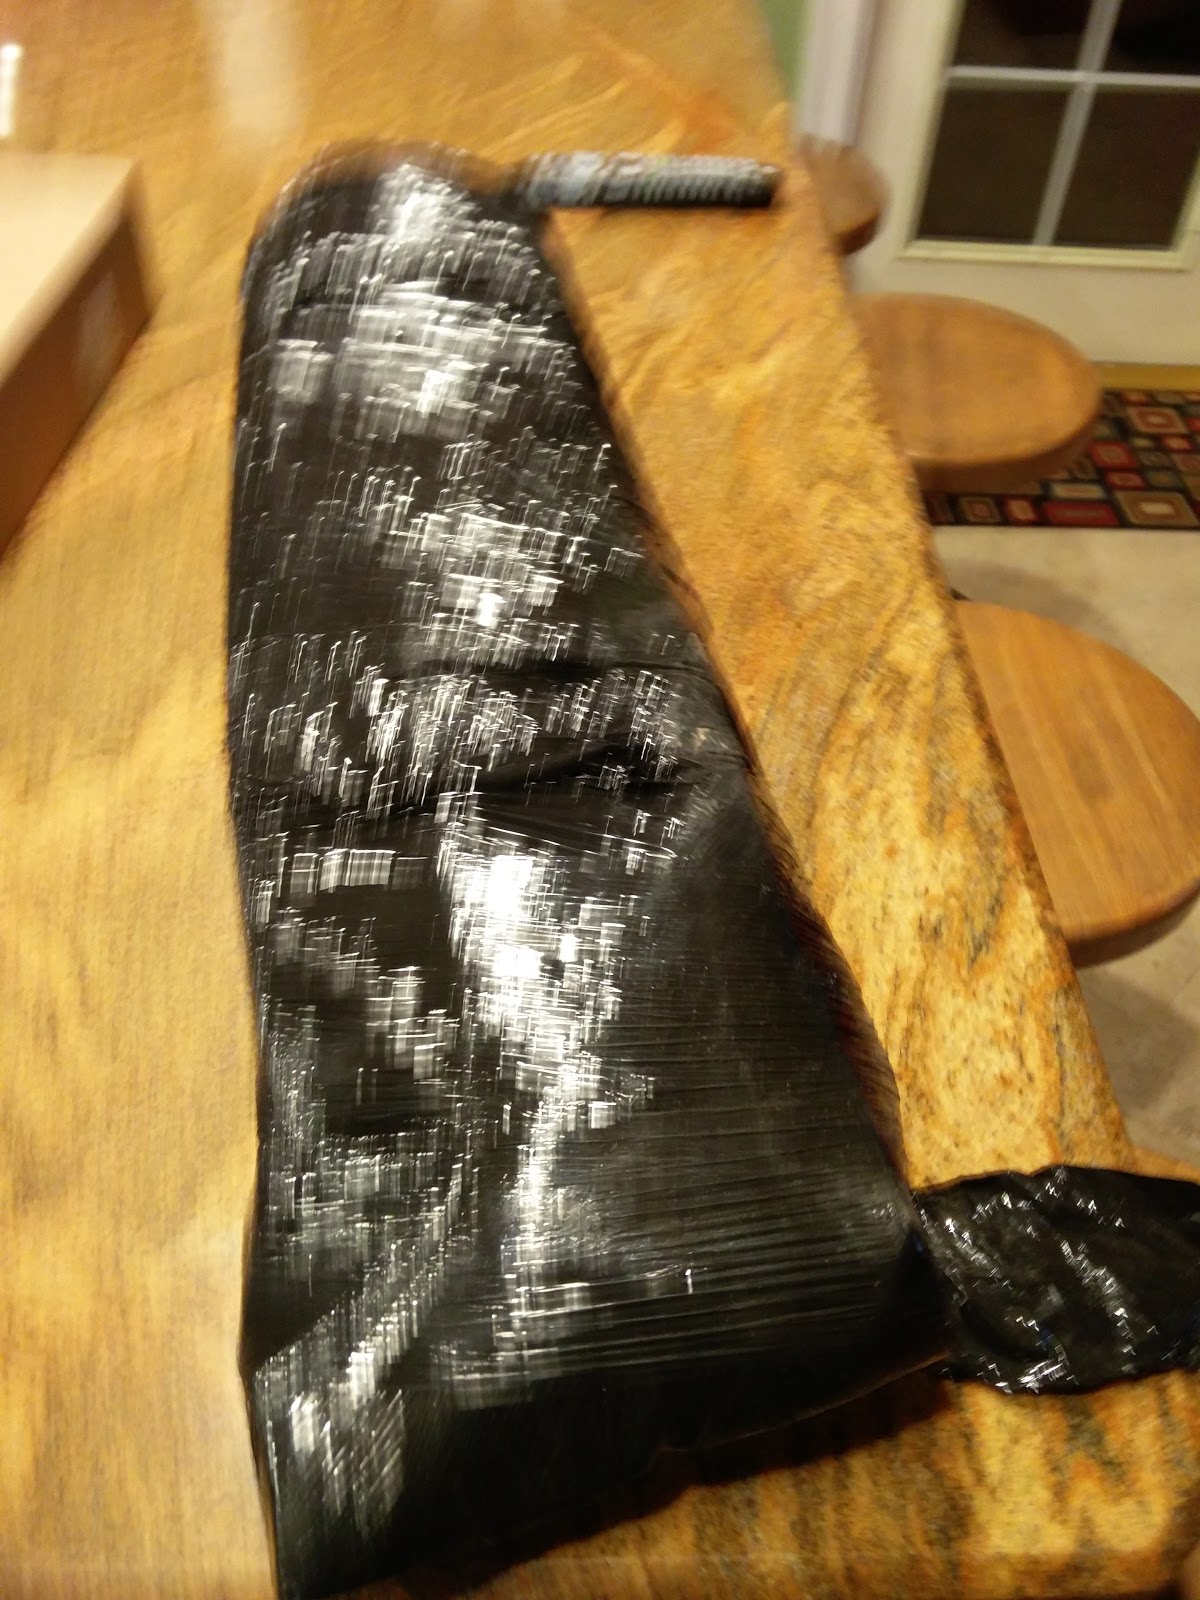
Damaged AC condenser. Pic courtesy of Bradd K.


Nicely protected side coolers


I swear a 2x4 could get in that area. I purchased a Kerscher carbon fiber front splitter (next blog how to) so I decided to do the grill mod. I went to Lowes and picked up what is called lath. It's galvanized steel mesh sheeting used for stucco applications. I chose galvanized for rust prevention.

TOOLS NEEDED


  • T25 torx bit - use a rachet, screwdriver or some sort of handle
  • Jack + ramps or jack stands - You could work on it from the ground but you won't have much space underneath
  • bucket or clamp - used to capture liquid from headlight washers or pinch it off.  
  • zip ties - I used long ones. easier to run them through existing openings. You can use short ones and extend them but more work.
  • wire cutter, heavy duty scissors, tin snips, or dremel to cut through your choice of mesh.
  • spray paint - I used Plastidip because I had leftover and it's great adhesion ability. P

TIME TO ALLOT - 1 to 2 hours depending how fast you can unscrew and screw everything.


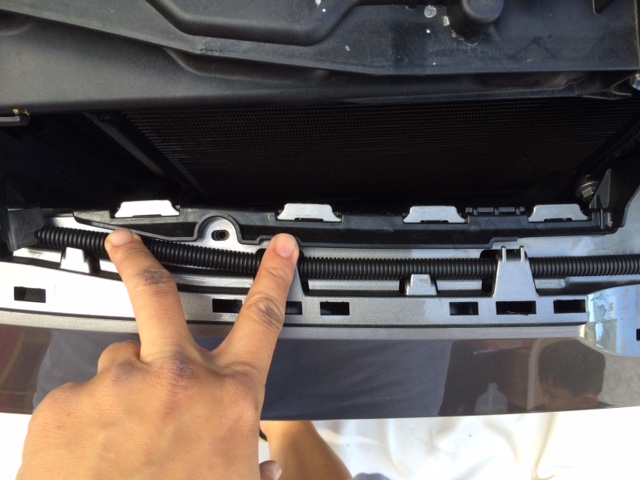
To remove the bumper you will need a T25 torx bit. It's best to get the car on ramps or jack stands in the front. If you use jack stands you'll also have more room to get to the bolts in the fender well or you can turn the wheels on the ramps (BE CAREFUL DOING THAT).

There are 2 on top of the grill then you will pull the grill off.
2 screws on top edges


yanks straight up!
3 screws on each side under the fender. 2 on top and 1 on bottom


you can see the middle and bottom bolt here

this shows the top and middle bolt hole. top holds bumper to fender


7 screws on the bottom to remove the undercover (not pictured)


You need to pry off the bumpers from the side with some force. The front part of the bumper are held by clips that you simply slide it forward. Once you do you will see the headlight washer lines. Either pinch them with something or have a bucket ready because once you remove the hose, ALL the fluids will come rushing out. Ask me how I know this? The hose is easily removed by squeezing the blue buttons. Very easy.

headlight washer hose. you simply remove it.
pop the bumper off. you'll need to put a good amount of force


squeeze the blue bottons to remove from headlight washers. 


have a container ready or pinch off the line!


Going back to the mesh it cost $6 plus tax. It's a large sheet 26x97 inches I believe. I cut out a 44x9 inch rectangle. I'd suggest wearing thick gloves when cutting. I didn't and cut up my fingers. I painted it using my leftover Plastidip in black. I like that product since it doesn't need any form of primer to hold on too.  You can use whichever paint you like. You can also buy other types of grills if you prefer a different look.

Trim to fit then start zipping up. zip ties are very strong and used even to hold up bumpers. I love zip ties!


I used only long zip ties around the plastic area to hold down the grill. Some spots closes to the bottom corner of the grill I used openings that were 3-4 inches apart so I slid it down one side then used a pick to grab it out the other hole. You can see in the pic I just covered all the corners just to hold it down.


Trimmed mesh and ready to cut the zip ties

Install everything in reverse order...


You can see the final product and the oem grill in the side opening which VAG should have put there in the first place.

So for a Total of under $10 I have somewhat good protection. I'd guestimate my odds of getting through and damaging my condenser is are way way lower than without!!!!


Featured Post

My DIY splitter / lip for the R. Cheap mod!

Today I made my own splitter. I used my old Kerscher lip as a template to cut out some 1/4 inch ABS sheeting. Used my heat gun to make t...